Changing a light bulb in a high ceiling can seem like a daunting task, but it doesn’t have to be. Whether you’re dealing with a towering chandelier or a light fixture in a double-height foyer, this guide will walk you through the process step by step. You don’t need to call a professional every time a bulb burns out; with the right tools and a little know-how, you can easily do it yourself. In this article, we’ll cover everything from safety precautions to the actual bulb replacement, ensuring you have a well-lit space in no time.
Change Light Bulb High Ceiling
Changing a light bulb in a high ceiling can be a challenging task, but with the right tools and precautions, it can be done safely. Here’s a step-by-step guide on how to change a light bulb in a high ceiling:
Tools and materials you’ll need:
- New light bulb: Make sure it’s the correct type and wattage for your fixture.
- Ladder: Choose a sturdy, non-slip ladder tall enough to reach the light fixture comfortably.
- Ladder stabilizer: This is an optional but highly recommended tool that attaches to the top of the ladder to provide more stability.
- Safety glasses: Protect your eyes from debris or glass fragments.
- Gloves: Protect your hands from sharp edges or hot bulbs.
- Assistant: If possible, have someone hold the ladder or pass you tools.
Procedure:
- Turn off the power: Ensure the electricity to the light fixture is turned off at the circuit breaker or fuse box. Use a voltage tester to confirm that there is no electrical current running to the fixture.
- Prepare your workspace: Clear the area below the light fixture of any furniture or obstacles. Lay down a drop cloth to catch any debris or dust.
- Position the ladder: Set up your ladder on a level surface, ensuring that it’s stable and secure. If available, attach a ladder stabilizer to the top of the ladder for added safety.
- Climb the ladder: Ascend the ladder carefully, making sure to maintain your balance. Always keep both feet on the ladder and never overreach.
- Remove the old bulb: Carefully unscrew the old light bulb counterclockwise. If the bulb is stuck, use a bulb changer tool with a suction cup or a pair of needle-nose pliers. Be cautious not to break the bulb.
- Dispose of the old bulb: Place the old bulb in a safe container for disposal. Do not throw it into the regular trash.
- Install the new bulb: Screw the new light bulb clockwise into the socket. Make sure it’s securely in place but avoid overtightening, as this can damage the fixture or bulb.
- Descend the ladder: Carefully climb down the ladder while holding the new bulb securely.
- Turn on the power: Return to the circuit breaker or fuse box and turn the power back on. Test the new bulb to ensure it’s working properly.
- Clean up: Remove the drop cloth and clean any debris or dust that may have accumulated.
Remember, safety is paramount when working with electricity and on ladders. If you’re uncomfortable with any part of this process or if the ceiling is exceptionally high, it’s advisable to hire a professional electrician to handle the task.
Considerations on Changing Light Bulbs in Tall Ceilings
Changing light bulbs in tall ceilings requires careful planning and considerations to ensure safety and efficiency. Here are some key considerations:
Safety First:
- Ensure the electricity to the fixture is turned off before starting any work. Use a voltage tester to confirm that no current is running to the fixture.
- Wear safety glasses and gloves to protect your eyes and hands.
- Use a sturdy, well-maintained ladder that is tall enough to reach the light fixture comfortably without overreaching.
- Consider using a ladder stabilizer or platform to enhance stability and balance.
Selecting the Right Bulb:
- Choose a bulb that is compatible with your fixture in terms of type (incandescent, LED, CFL, etc.) and wattage. Check the fixture’s label or manual for specifications.
- Consider using long-life bulbs or LEDs, which require less frequent replacement.
Gather Necessary Tools:
Ensure you have all the tools and equipment you need before starting the task, such as a replacement bulb, a bulb changer tool with a suction cup or gripper, and a container for disposing of old bulbs.
Prepare the Workspace:
- Clear the area beneath the fixture of any furniture or obstacles to create a safe working space.
- Lay down a drop cloth to catch any debris or dust that may fall during the bulb replacement.
Assistance:
Having an assistant can be very helpful. They can hold the ladder, pass you tools, or provide guidance from the ground.
Ladder Safety:
- Always set up the ladder on a level surface, ensuring it is stable and secure.
- Maintain three points of contact on the ladder at all times (two feet and one hand or two hands and one foot).
- Never lean or overreach while on the ladder, as this can lead to accidents.
Bulb Removal and Installation:
- When removing the old bulb, turn it counterclockwise gently. If it’s stuck, use a bulb changer tool or pliers designed for this purpose.
- Carefully screw the new bulb clockwise into the socket, making sure it’s securely in place but not overtightened.
Clean-Up:
- Dispose of old bulbs properly, as they may contain hazardous materials. Check local regulations for disposal guidelines.
- Clean up any debris, dust, or packaging materials after the task is complete.
Testing:
After changing the bulb and turning the power back on, test the new bulb to ensure it’s functioning correctly.
Regular Maintenance:
Consider a routine maintenance schedule to check and replace bulbs in high ceilings, reducing the need for urgent replacements.
Professional Help:
- If the ceiling is exceptionally high, or if you’re uncomfortable with the task, consider hiring a professional electrician with experience in high-ceiling installations.
- By following these considerations and taking safety precautions, you can change light bulbs in tall ceilings safely and effectively.
Best Way to Change Light Bulbs in High Ceilings
Changing light bulbs in high ceilings can be a challenging task, but it can be done safely and efficiently with the right approach. Here’s a step-by-step guide on the best way to change light bulbs in high ceilings:
Safety First:
- Turn Off Power: Always turn off the power to the light fixture before attempting to change the bulb. This can be done at the circuit breaker or by switching off the light switch.
- Gather Materials: You’ll need a sturdy ladder that can reach the height of the ceiling, a replacement bulb, and any necessary tools like a bulb changer pole or suction cup.
Changing the Bulb:
- Choose the Right Bulb: Make sure you have the correct replacement bulb with the same wattage and type as the one you’re replacing.
- Position the Ladder: Place the ladder on a level surface directly beneath the light fixture. Ensure the ladder is stable and doesn’t wobble.
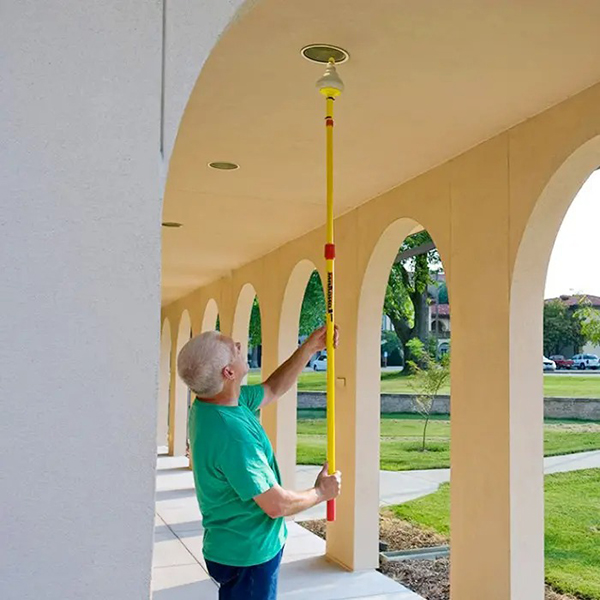
- Use a Bulb Changer Pole (Optional): If the light fixture is out of reach even with a ladder, consider using a bulb changer pole. This tool has a grip to securely hold the bulb and can be extended to reach high ceilings.
- Suction Cup Method (Alternative): If you don’t have a bulb changer pole, you can use a suction cup tool specifically designed for removing and installing bulbs. Attach it securely to the bulb, and twist counterclockwise to remove the old bulb and clockwise to install the new one.
- Unscrew the Old Bulb: If using your hand, gently twist the old bulb counterclockwise to remove it. Be cautious not to break the bulb.
- Install the New Bulb: Carefully screw in the new bulb clockwise until it’s snug but not over-tightened. Do not force it.
Finishing Up:
- Test the New Bulb: Before packing up your tools, turn the power back on and test the new bulb to ensure it’s working correctly.
- Secure the Ladder: After you’ve completed the task, make sure the ladder is properly folded and stored away safely.
- Dispose of the Old Bulb: If the old bulb is not LED or CFL, it may contain hazardous materials. Check local regulations for proper disposal methods.
Additional Tips:
- If you’re uncomfortable or unable to safely change the bulb yourself, consider hiring a professional electrician or maintenance person with the necessary equipment and experience.
- Use caution when working with electricity and always prioritize safety.
- If the ceiling is exceptionally high or the fixture is in a hard-to-reach spot, consider installing longer-lasting LED bulbs to reduce the frequency of bulb changes.
By following these steps and exercising caution, you can change light bulbs in high ceilings safely and efficiently.
How to Use a Light Bulb Grabber
A light bulb grabber, also known as a bulb changer or bulb grabbing tool, is a helpful device designed to safely remove and replace light bulbs in hard-to-reach places, such as high ceilings. Here’s how to use a light bulb grabber:
1. Gather Your Materials:
- Light bulb grabber tool
- Replacement light bulb (ensure it matches the specifications of the old bulb)
- A sturdy ladder (if necessary)
- Safety glasses (optional, but recommended)
2. Prepare the Area:
- Ensure the power to the light fixture is turned off at the circuit breaker or switch.
- Place a sturdy ladder beneath the light fixture, positioning it so you can comfortably reach the bulb.
3. Extend the Grabber Tool:
- If your grabber tool has telescoping or extendable arms, extend them to reach the bulb. Most bulb grabbers have a long pole with a bulb-grabbing mechanism at the end.
4. Adjust the Grabber Mechanism:
- Some grabber tools have different types of bulb-grabbing mechanisms. Ensure the grabber is set to securely grip the bulb. Common mechanisms include suction cups or spring-loaded grips.
5. Securely Attach the Grabber to the Bulb:
- Position the grabber tool’s mechanism around the base of the light bulb. Make sure it’s centered and securely attached to the bulb.
6. Twist Counterclockwise to Remove the Old Bulb:
- Apply gentle, even pressure and twist counterclockwise to unscrew the old bulb from its socket. Be cautious not to use excessive force, as this can damage the bulb or the grabber tool.
7. Remove the Old Bulb:
- Carefully pull the old bulb out of the socket once it’s unscrewed. Keep a firm grip on the grabber tool to prevent dropping the bulb.
8. Dispose of the Old Bulb Safely:
- If the old bulb is not an LED or CFL and contains hazardous materials, follow local regulations for proper disposal.
9. Insert the New Bulb:
- Position the new bulb on the grabber tool’s mechanism, ensuring it’s securely held in place.
10. Screw in the New Bulb:
- Carefully guide the new bulb into the socket and twist it clockwise to secure it in place. Ensure it’s snug but not over-tightened.
11. Remove the Grabber Tool:
- Gently release the grabber tool’s mechanism from the bulb once it’s securely in place. Make sure the grabber doesn’t damage the bulb during removal.
12. Test the New Bulb:
- Turn the power back on and test the new bulb to ensure it’s working correctly.
13. Secure the Ladder (if used):
- After completing the task, fold the ladder and store it safely.
Using a light bulb grabber can significantly simplify the process of changing bulbs in high or difficult-to-reach fixtures, enhancing safety and convenience. Always prioritize safety when working with electricity and at elevated heights.
How to Safely Replace Light Bulbs in a High Ceiling Fan
Changing light bulbs in high ceiling fans can be a bit challenging, but with the right tools and precautions, it’s a manageable task. If you’re exploring new lighting options for your ceiling fan, we have some helpful tips for you.
While it’s advisable to hire a professional for electrical work, we’ll provide you with some basic tips and tricks on how to replace light bulbs yourself.
High ceiling fans are typically installed to maintain the aesthetic appeal of your living space, especially if you have tall or vaulted ceilings. However, this also means that you may need to replace the light bulbs in your ceiling fan from time to time.
First and foremost, ensure you put on a pair of safety gloves before handling any part of your ceiling fan or changing the bulb. This precaution will protect you from electric shocks and prevent accidents like cuts from sharp edges.
Once you have your safety gloves on, the next step is to turn off the power to the fan, making sure it’s completely unplugged and disconnected before you proceed to work on it. After doing this, safely remove all the light bulbs from your ceiling fan and dispose of them properly.
Next, unscrew the cage that holds your light bulbs and remove it. You should now be able to locate all the light bulb sockets. If any of them appear corroded or burnt out, it’s necessary to replace the socket to ensure the fan functions properly without flickering lights.
After replacing the damaged sockets, double-check that the light bulbs are securely seated in each of them. Be cautious when screwing the cage back into place to avoid damaging any electrical components. Once you’ve completed these steps and verified everything, it’s time to turn the power back on to ensure there are no malfunctions while using the fan.
This serves as a general guide on changing light bulbs in high ceiling fans. If you have specific questions about certain components or need further assistance, it’s always advisable to seek help from a qualified electrician.
How Can I Hire Someone To Change the Light Bulb Professionally?
To hire a professional to change a light bulb, you can follow these steps:
Determine the Type of Professional Needed:
Depending on the location and type of light fixture, you may need either an electrician or a general handyman. If it involves electrical work or fixtures in hard-to-reach places, an electrician is the right choice.
Search for Local Professionals:
Online Services:
Use websites or apps like Angie’s List, Thumbtack, Yelp, or HomeAdvisor to find local professionals who can assist with light bulb replacement.
Ask for Recommendations:
Seek recommendations from friends, family, or coworkers who may have used a reliable electrician or handyman in the past.
Check Qualifications:
Ensure that the professional you hire is licensed and insured, especially if it involves electrical work.
Ask for references or check online reviews to gauge their reputation and reliability.
Request Quotes:
Contact multiple professionals and request quotes for the job. Be specific about the type of bulb, its location, and any potential complications.
Compare quotes and choose the professional who offers a reasonable price and meets your requirements.
Discuss the Job:
Once you’ve selected a professional, discuss the details of the job, including the type of light bulb required and any other specific instructions.
Confirm their availability and schedule a convenient time for the service.
Prepare the Area:
Before the professional arrives, clear the area around the light fixture, ensuring easy access and safety.
Supervise the Work (optional):
You can choose to be present while the professional changes the light bulb to ensure everything is done correctly and safely.
Payment:
After the job is completed to your satisfaction, pay the professional as agreed upon. Some may prefer cash, while others accept electronic payments or checks.
Ask for a Receipt or Invoice:
Request a receipt or invoice that includes a breakdown of the charges and any warranty information.
Feedback and Reviews:
If you are satisfied with the service, consider leaving a positive review or feedback online. This can help others in your community find reliable professionals.
By following these steps, you can hire a professional to change a light bulb safely and efficiently. Remember that for more complex electrical work, it’s crucial to hire a licensed electrician to ensure both safety and compliance with local regulations.
- Related post: How to Change the Time on a Samsung Stove

Erik Kelly with more than 30 years of working in the field of technology and games. Erik Kelly will answer all your questions related to the latest technology products, new game reviews at Timrim.com website.